How To Build A Xampp Localhost Server In 10 Mins....
It’s always a good practice to test your site on the local server before you actually publish it to the real server. And to create a local server environment on your windows machine, you can use XAMPP. XAMPP stands for X- cross-platform, A- Apache, M- MySQL, P- PHP, P- Perl. It is a completely free and open source solution that gives you an incredible local web server to work on. Installing XAMPP sets you free from learning and remembering commands to run Apache, MySQL, etc. It simply gives you a control panel to manage all the inclusive components.
Once you have XAMPP installed on your PC you can install any CMS, including but not limited to WordPress on your Local PC. Since we have already discussed how to move WordPress from localhost to live server so, you don’t have to worry about the later process after installing WordPress locally. Simply test your site thoroughly on XAMPP and make most of it.
How to Install XAMMP on Windows 10
So without ado, let’s get started with the step-by-step guide to how to install XAMPP on Windows 10. And I am very sure by the end of this post, you’ll be having your very own local WordPress testing environment on Windows 10.
Step 1: Download and Install XAMPP
To download and install XAMPP, go to apachefriends downloads page, the official link to download XAMPP from. You will see XAMPP ready to download for cross-platform like Windows, Linux, Mac OS X. Since we are discussing How to install XAMPP on Windows 10, therefore, we will choose the Windows option as shown below.

1.XAMPP Setup Wizard
During the installation process, you may come across warning pop-ups. But you would probably click ‘Yes’ to start the installation process. Soon after you click on the downloaded file, the XAMPP setup wizard will open. Now click on the ‘Next’ Button to proceed.

2.Select Components
Next, you need to check the components which you want to install and can uncheck or leave as it is which you don’t want to install. You can see there are a few options which are light grey in color. These are the options which are necessary to run the software and will automatically be installed. Now click on the ‘Next’ button to continue.

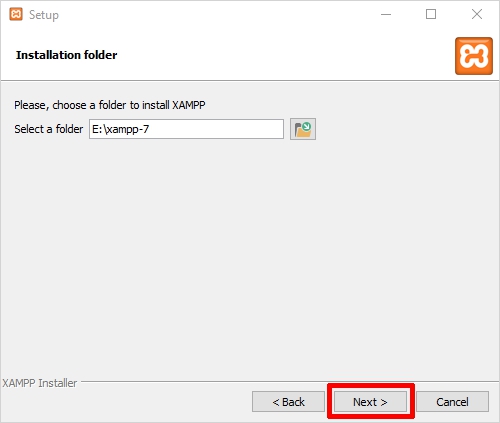
3.Select Installation Folder
Now you need to choose the folder where you want to install the XAMPP. You can choose the default location or you can choose any location of your choice and choose the ‘Next’ button to move ahead.
4.Bitnami for XAMPP
Now will see a window showing you information about Bitnami. Simply click on the ‘Next’ button to move further. However, if you wish to learn more about the Bitnami, then you may check the box saying ‘Learn more about Bitnami for XAMPP.’
Basically Bitnami is for installing open source applications i.e. WordPress, Joomla etc on your newly installed XAMPP.

5.Ready to Install
Now you’ll see another window with a message “Setup is now ready to begin installing XAMPP on your computer” like shown below. You just have to hit the ‘Next’ button to proceed.

6.Welcome to XAMPP Wizard
Now just be patient and wait for the installation to complete.

7.Installation Complete
Once the installation is completed, you will be asked whether you would like to start the control panel now or not, displaying the message “Do you want to start the control panel now?” Check the box and click on the ‘Finish’ button and see if the XAMPP is working fine.

Step 3: Select your XAMPP Install Language
As soon as you will click on the Finish button in the final step of install XAMPP process, you will be asked to select the preferred language between English and German. It is up to you which language you choose. After that click on the ‘Save’ button to confirm your selected language. As of now, I am choosing the English language.

Step 4: XAMPP is now Installed, run it
If the entire process of XAMPP installation went correctly, then the control panel would open smoothly. Now click on the ‘Start’ button corresponding to Apache and MySQL.


That’s it. You have successfully installed XAMPP on Windows 10. Or say you have successfully installed XAMPP locally. Once you start the modules, you should see their status turn to green. Whereas, on the right side, you can see the process ID number and port numbers every module is using. You’re good to go now. Happy XAMPPing!!
Wrapping Up
Now you know how easily you can install XAMPP to test and install your WordPress site locally before hitting the live server. Certainly, the biggest advantage of installing XAMPP is that you don’t have to worry about the number of attempts you make or the kind of experiments you perform on your site. You can freely try anything you want without any tension of losing your users. However, if you face any error while installing XAMPP on your Windows machine, then do let me know in the comments below. I will try my level best to resolve the errors. Nonetheless, creating a stunning new website piece of cake if you use TemplateToaster website builder. It is indeed, a dynamic website builder to give you an amazing website without any coding skills. So, try now!!


Great job for publishing such a nice article about Xampp. Your article isn’t only useful but it is additionally really informative. Thank you because you have been willing to share information with us. how to change port number in xampp server
ReplyDelete